Posts tagged ‘holiday card’

November 7, 2014

Paper craft project no. 298: Merry Christmas

It’s the first Friday of the month, which means we have a new challenge at STAMPlorations! This month, the theme is STAMPS & LAYERS. Lee-Anne Cross is joining us as guest designer this month and her card is simply stunning! The STAMPlorations girls did a wonderful job as well — you’ll have to check out the blog to how they interpreted the theme with their gorgeous creations! The winner doesn’t just get bragging rights, but a guest design spot and stamps too! The challenge is open until November 30 so we hope you’ll come play along.

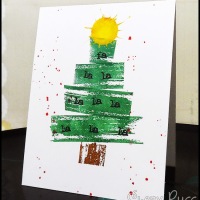
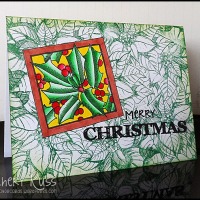
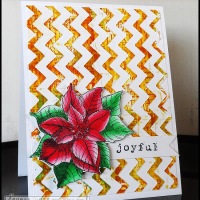
As for my card…I layered in 3 different ways. For the background, I created a faux layer by stamping the poinsettia in white chalk ink several times and masking as I went along. Then I stamped the sketchy Christmas sentiment in red chalk ink before stamping it in black ink and a little offset to create a layered or drop shadow effect. And last, I stamped the poinsettia again on pre-cut diecuts, colored them with Spectrum Noir alcohol markers, and then layered them onto my card base using foam dots. I think I managed the “layers” part of the challenge without going through the agony of layering different elements like diecuts, patterned papers, and such :o)

Thanks so much for stopping by!

~Shery

PS: I’m having a design team call for a new challenge that starts on January 6. If you enjoy making one layer cards and Christmas cards, please check it out here. If you know someone who’d be interested, please pass the info along and thank you in advance! :o)

November 1, 2014

Paper craft project no. 294: ‘Tis the season mixed media card + video tutorial


We have a brand new challenge at The Mixed Media Card Challenge! Our theme this month is Christmas with bells as the optional element. So create a Christmas-themed mixed media card with or without bells and link it up to our challenge! We’d love to see what you come up with. For our definition of a mixed media card, click here. The challenge runs until November 25 so plenty of time to create and play!

We have STAMPlorations as our sponsor too and there are 2 prizes up for grabs. Create a mixed media card that has the optional element for a shot at a $15 gift certificate. If you stick to just the theme, you still get a shot at winning 1 stamp set. Do check out the cards the mixed media card girls made — you’ll be blown away!

For my mixed media card, I used archival inks, Distress inks, Twinkling H2Os, Gelatos, water soluble oil pastels, and Chameleon Color Tones. I used Holiday Sketches: Christmas Bells and Holiday Sketches: Christmas Flower. Here’s a video showing how I created my card. It’s a shorty — a little over 9 minutes long, in fast-forward motion, captioned, and accompanied by Christmas music. I’d love to hear what you think!

[youtube:https://www.youtube.com/watch?v=pfJoKY6f1so%5D

I’d like to enter my card to the following fun challenges: Simon Says Wednesday Challenge – Anything Goes; Brown Sugar Challenge #118 – Anything Goes; Weekly Christmas Card Challenge #48 – Anything Goes; Crafty Hazelnut’s Christmas Challenge Extra – Anything Goes for November; Crafty Catz Challenge #253 – Anything GoesSister Act Card Challenge #81 -Anything Goes, and Word Art Wednesday #156 – Anything Goes.

Thanks for stopping by!

~Shery

January 21, 2014

Paper craft project no. 118: Mail your packages early

2014-01-22 CAS Mail your packages
I’m happy to share that I’ve joined the fun and talented design team over at The Crafter’s Cafe Challenge Blog and this is my first post as a DT member. This week, we’d love to see projects that are funny or whimsical. In line with 2 of my goals this year (to stay on top of my Christmas card-making and do more coloring with markers), I decided to create this Christmas card using one of the images of our sponsor, Bugaboo Digi Stamps.  To create this card, I printed out this dotty Christmas digi paper on glossy photo paper, trimmed it down to A2 size, and adhered it to my card base. Next, I printed the Bugaboo digi stamp on white cardstock, trimmed it, colored it with Memento and Distress markers, stuck it to red cardstock, and mounted it on my card base with foam dots. I created a second smaller panel and mounted it as well. I doodled some borders with a black marker and finished the card by affixing paper brads. I hope you’ll stop by at The Crafter’s Cafe Challenge Blog, see the other fun and whimsical projects that my teammates created, and then join in!

The Crafter's Cafe Challenge Blog

I based the design of my card on Retrosketches #98. I’m also entering this card to the following fun challenges: Brown Sugar – Anything Goes; Frosted Designs Friday Challenge – Polka Dots; Sister Act Challenge – Anything Goes; Addicted to Stamps and More #79 – Clean and Simple; and Addicted to CAS – New (I made a card using a digi stamp — new to me! — and the glossy photo paper I printed the digi paper on is from a new box).

Thanks for stopping by!

~Shery

December 16, 2013

Paper craft project no. 100: Be merry

2013-12-14 Be merry
Here’s an A2 card — my 100th paper craft project I’ve blogged about! I’ve made more than that since starting the blog in July — but being able to share my paper craft projects regularly every week is infinitely satisfying. It gives me a sense of accomplishment…and I finally found something I can blog about consistently!

Anyway, for this card, I stamped paint brushes, ink blots, and ink spatters in alternating emerald green and rose madder archival inks on the bottom area of my card base. On scrap watercolor paper, I stamped a newspaper background in gray flannel ink. I trimmed it to size and rounded off the bottom corners with my corner rounder punch. I then adhered it to my card base. Next, I stamped a wonky double running stitch all around the panel in love letter ink. On scrap watercolor paper, I stamped the winter words in tuxedo black ink (Memento), cut it out using a 2-inch circle punch, and lightly sponged the edges with love letter ink. To create the 3 strips, I used the chevron stamp with the love letter ink. I adhered them to my card using foam dots. I stamped the sentiment in tuxedo black ink. I finished the card by rounding the bottom corners with my corner rounder punch.

I based the layout of this card on the current Fusion Card Challenge sketch. I’m linking up this card to the following fun challenges: Brown Sugar Challenge #72: Christmas; Chocolate, Coffee & Cards Challenge #54: Happy Holidays; Dream Valley Challenge #72: Christmas; and Sister Act Card Challenge #37: Anything Goes.

I’m also linking this card to 2 challenges that my good friend Nonni is hosting at her blog: Let’s Get Inky: Stamp a Happy Christmas and Christmas Cards Out of Old Stash/Scraps. I hope you can join us over there by the 24th! Nonni will be randomly drawing a winner for each challenge and the winners will receive the It’s All About YOU! rubber stamp set from STAMPlorations.

Supplies
Stamps – Winter Wonderland [round image] (Fiskars); Newspaper Background (Hero Arts); Patchwork Frenzy: Graphic Squares [stitches], Holiday Artsy [paint brush, ink blots, and ink spatters], VIGNETTE: Chevron & Arrows [chevron] , and Oh, Christmas Tree! [sentiment] (STAMPlorations)
Inks – Emerald Green, Rose Madder (Ranger); Gray Flannel, Love Letter, Tuxedo Black (Memento)
Paper – 140-lb cold-press watercolor paper (Canson)
Also – 2-inch circle punch (Fiskars); corner rounder; glue dots; foam dots
*****

Thanks so much for stopping by!

~Shery

December 14, 2013

Paper craft project no. 99: Happy holidays

2013-12-14 CAS Happy Holidays
Hello! Can you believe Christmas is almost here? I’m hoping to be done wrapping gifts and making cards this weekend and aiming to get everything mailed no later than Tuesday — fingers (and toes) crossed! Here’s one of several cards I made last night. On watercolor paper (Canson), I stamped paint brushes, ink spatters, ink blots, and a funky Christmas tree (STAMPlorations) in 3 different Ranger archival inks: jet black, emerald green, and sienna. Then on scrap watercolor paper, I stamped the scalloped snowflake in Versamark watermark ink 3 times then embossed them in different embossing powders: jaded pearl, detail copper, and detail gold (Stampendous). Then I fussy cut the embossed snowflakes and adhered them to my card base using foam dots. I stamped the sentiment in tuxedo black (Memento) on the lower right and finished the card by rounding off one corner with my corner rounder punch.

I based the layout of this card on the CAS(E) This Sketch #57. I was also inspired by the photo over at Addicted to Stamps and More Challenge #75 (the Christmas tree and color — which gave me a good excuse to use sienna/burnt amber, copper, and gold, as they all give me a warm feeling/glow.) And since my focal images are snowflakes, they fit 4 more of my favorite challenges: CASology #74: Snowflake, Addicted to CAS #28: Snowflakes, CAS-ual Fridays #123: Let It Snow, and Simon Says Wednesday Challenge: Let It Snow.


Supplies:
Stamps – Winter Wonderland (Fiskars); Holiday Artsy and Oh, Christmas Tree! (STAMPlorations)
Inks – Emerald Green, Sienna, Jet Black (Ranger Archival); Tuxedo Black (Memento)
Paper – 140-lb cold-press watercolor paper (Canson)
Also – Jade Pearl, Detail Gold, Detail Copper embossing powders (Stampendous); Versamark watermark ink pad; heat tool (Ranger); foam dots; corner rounder punch
*****

Thanks so much for stopping by. I hope you’re keeping warm!

~Shery

December 12, 2013

Paper craft project no. 98: Celebrate the season

2013-12-12 CAS Celebrate the season
Here’s a quick and simple Christmas card. I cut out a panel (4″ by 5.5″) from scrap watercolor paper. I found an old snowy trees border stamp (from Posh Impressions – this one said it’s from 1997) so I stamped it with Versamark watermark, sprinkled detail gold embossing powder (Stampendous), and heat embossed. I did the same thing with the sentiment (Merry set from STAMPlorations). I distressed the edges a bit before mounting it on my card base with foam dots. Done! The hubby was watching me the whole time I made this card — a first, because he usually stays away from my craft table. He was amazed when he saw the embossing powder melt and gasped when I started distressing the edges of my panel with a distressing tool. He couldn’t understand why anyone would want to distress perfectly straight edges and I assured him distressing is a style ;-)

Anyway, this card fits 3 challenges:

Thanks so much for stopping by. And only 13 days ’til Christmas!

~Shery

December 11, 2013

Paper craft project no. 97: Merry Christmas

2013-12-10 OLC Merry Christmas
Another one layer card before I call it a day. It’s been a long, exhausting day, so I’ll keep this post short and sweet. I used the colors in The Paper Players Challenge #175: Pink Pirouette, Old Olive, and Raspberry Ripple for this card. “Snowflake” is the cue word in this week’s CASology Week #74 challenge and “Snow” is the theme over at Keep It Simple Challenge #28.

I stamped (and shadow-stamped) various images to create the background. The solid squares and circles, ink blots and spatters (Holiday Artsy set from STAMPlorations) are stamped in pink pastel (ColorBox chalk ink) and soft olive (Hero Arts). I stamped the snowflakes (Fiskars) in raspberry jam mid-tone ink (Hero Arts) — I stamped with bit more pressure than usual because I wanted the ink to bleed to make it look like the snowflakes are sort of melting. Then I stamped the sentiment (from the Holiday Artsy set) ombre-style — I kept stamping until there was no ink left on the stamp. I finished off the card by rounding one corner with my corner rounder punch.


Thanks so much for stopping by. Lights out for me! :-)

~Shery