Posts tagged ‘Tim Holtz’

August 4, 2013

One Layer Card No. 26: Love Wish Dream

2013-08-03 One Layer Card Love wish dream

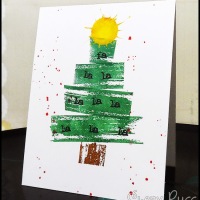
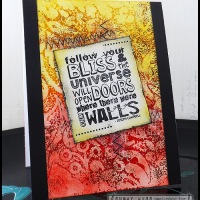
A2 card using blending, repetition, layer stamping and second-generation stamping techniques.

Stamps: circles, checkered background, sentiment (Stampers Anonymous); grunge bubble wrap (STAMPlorations)
Inks: tuxedo black (Tsukineko Memento Dye Ink);  sienna (Ranger Archival ink); mustard seed, wild honey, spiced marmalade, dried marigold, brushed corduroy (Tim Holtz Distress ink)

Here are the steps for creating this one layer card:

1. Using foam blending tool, color card base with distress inks.

2. Stamp circles on left side of card, then stamp grunge bubble wrap.

3. Stamp checkered background by stamping on scrap paper before stamping on card base.

4. Stamp sentiment.

A little bit about this card: When I was making this card last night, I was distracted by my niece, whom I fondly refer to as The Adorable One. We were Skyping so I had one eye on this card and one eye on her. I wasn’t really looking at where I was shading and blending ink most of the time and it took me 3 tries until I got the card right ;-). She is 21 months old and she loves to count from 1 to 13 and was showing off to her auntie. She’s also able to recognize numbers and letters so she loves it when people wear shirts with writings on them. Last night, her uncle (my brother-in-law) was wearing a shirt with big letters on the back so she kept pointing to the letters and saying what they are. You obviously can tell I’m not too crazy about my niece :-D

theadorableoneandmeHere’s one of my favorite pics of me and The Adorable One. It was taken in November last year, the day before my husband and I were scheduled to fly back to California after a month of visiting my family overseas. She turned a year old the week before. (And I planned the trip so that I’d be there on her birthday.)


Related articles

August 3, 2013

One Layer Card No. 25: Hey smile

2013-08-02 One Layer Card Hey smile

A2 card using direct and layer stamping, masking, shading, and blending techniques.

Stamps: sentiment (TPC Studio); doodle alpha (Autumn Leaves); camera, film (BoBunny)
Inks: mustard seed, vintage photo (Tim Holtz Distress ink); chrome yellow, sienna, jet black (Ranger Archival ink)

Steps for creating this one layer card:

1. Stamp sentiment on lower right of the card base.

2. Stamp camera and meter above sentiment

3. Stamp film on lower left and upper right of card base at an angle.

4. Stamp doodle alphas to spell out “hey”.

5. Mask middle of the card base with about 3/4″ of white on the upper and lower areas showing. Apply distress ink on these areas with a foam applicator. Remove mask.

6. Shade the images with vintage photo distress ink using a water brush.

Entering this in the Birthday Card Challenge over at Moxie Fab World.

5e1ab-pc20613

Related articles

August 1, 2013

One Layer Card No. 23: Hello

2013-07-31 One Layer Card Hello
A2 card using direct stamping, repetition, and second-generation stamping techniques.

Stamps: phone (Heidi Grace); alpha stamps (Ki by Hampton Art); retro squares (Hero Arts); dot border
Inks: tuxedo black (Tsukineko Memento Dye Ink);  sienna, pale ochre, french ultramarine (Ranger Archival ink)

Steps for creating this one layer card:

1. Stamp dot border on lower and upper area of the card base.

2. Stamp phone in the center.

3. Stamp retro squares on the left and right sides of the phone.

4. Stamp alpha stamps to spell out “hello”

Related articles

July 31, 2013

One Layer Card No. 22: Enjoy the journey

2013-07-30 One Layer Card Enjoy the journey

A2 card using layer stamping, masking, blending, and distressing techniques.

Stamps: images (Docrafts Papermania, Stampers Anonymous); sentiment (Stampers Anonymous)
Inks: old paper, antique linen, vintage photo (Tim Holtz Distress inks); tuxedo black (Tsukineko Memento Dye Ink)

Steps for creating this one layer card:

1. Ink and stamp the first image (square) on card base.

2. Create a mask for the first image. Cover before stamping second image (rectangle).

3. Create a second mask for the second image. Cover before stamping third image (small rectangle).

4. Ink fourth image (old letter). Remove masks.

5. Stamp sentiment and arrow at an angle.

6. Using a foam applicator, color stamped images with distress inks. Blend and shade.

7. Finish by distressing the edges with antique linen.

Related articles
July 30, 2013

One Layer Card No. 21: Thanks so much

2013-07-29 One Layer Card Thanks so much

A2 card using masking, layer stamping, and repetition techniques.

Stamps: flowers (Stampin’ Up); sentiment (Inkadinkado)
Inks: broken china, dusty concord, barn door (Tim Holtz Distress inks); tuxedo black (Tsukineko Memento Dye Ink)
Other: alcohol ink pens GB5 and CT4 (Spectrum Noir); Stamp-a-ma-jig (Inkadinkado)

Yesterday was “make cards for the shop” day. I’m bringing the cards to the gift shop in town later this week to sell. The shop owner lets me have a small space for a 5-shelf display and a peg board for selling my handmade items — mixed media artworks, tile coasters, bottle cap pendants and key chains, handmade tags, art magnets, embellishments, and greeting cards. After making those cards, I ended my card-making day with this one layer card. I’m loving the Stampin’ Up two-step flower stamps so naturally, I wanted to use them again — that, and I really, really, really like the stamp-a-ma-jig! Unlike my previous one layer cards, I didn’t start out with a plan for this one. I just started stamping and before I knew it, I had something that eerily looked like an interpretation of CAS(E) This Sketch Challenge #38. In any case, I’m quite happy with this card :-)

Steps for creating this one layer card:

1. Stamp sentiment in black ink.

2. Create a mask for the sentiment and cover it.

3. Randomly stamp flower outline in black ink.

4. Stamp solid flower over the outlines using different distress inks.

5. Remove mask over the sentiment.

6. Color sentiment with alcohol ink pens.

Here’s the sketch again:

69aea-cts_sketch_38

Related articles
July 29, 2013

One Layer Card No. 20: Merry Christmas

2013-07-28 One Layer Card Merry Christmas

A2 card using sponging, blending, masking, and embossing techniques.

Stamps: reindeer, sentiment (Inkadinkado); background (Penny Black)
Inks: old paper, peeled paint, shabby shutters (Tim Holtz Distress inks); jet black, sienna, emerald green (Ranger Archival ink)
Other: clear embossing powder (Zing!); heat tool (Ranger); tinted embossing ink (Ranger)

Steps for creating this one layer card:

1. Cover the upper 2/3 of card base with post-it note before sponging and blending peeled paint, old paper, and shabby shutters distress inks on the bottom area.

2. Ink text background with emerald green and stamp. Remove post-it note.

3. Ink reindeer with jet black and stamp.

4. Ink sentiment with sienna and stamp.

5. Ink sentiment with tinted embossing ink and stamp over the same area again.

6. Apply clear embossing powder. Tap off excess. Emboss with heat tool.

Entering this in Penny Black Inc’s Beat the Heat Challenge. (The PB Christmas text background I used is very versatile — I know I’ll be using it a lot in other projects, particularly Christmas tags.)

pbbanner

Related articles
July 28, 2013

One Layer Card No. 19: Just because

2013-07-27 One Layer Card Just because

A2 card using layer stamping, repetition, masking, and blending techniques.

Stamps: flowers (Stampin’ Up); sentiment (Heidi Grace); newspaper background (Hero Arts)
Inks: peeled paint, broken china, dusty concord, barn door, dried marigold (Tim Holtz Distress inks); tuxedo black (Tsukineko Memento Dye Ink); jet black (Ranger Archival ink)

Steps for creating this one layer card:

1. Cover the middle of the card with a post-it note before sponging/blending peeled paint distress ink on the top and bottom areas.

2. Stamp flowers randomly using different distress inks.

3. Stamp newspaper background with peeled paint distress ink.

4. Remove post-it note and stamp sentiment.

Related articles